


What is DeepLink
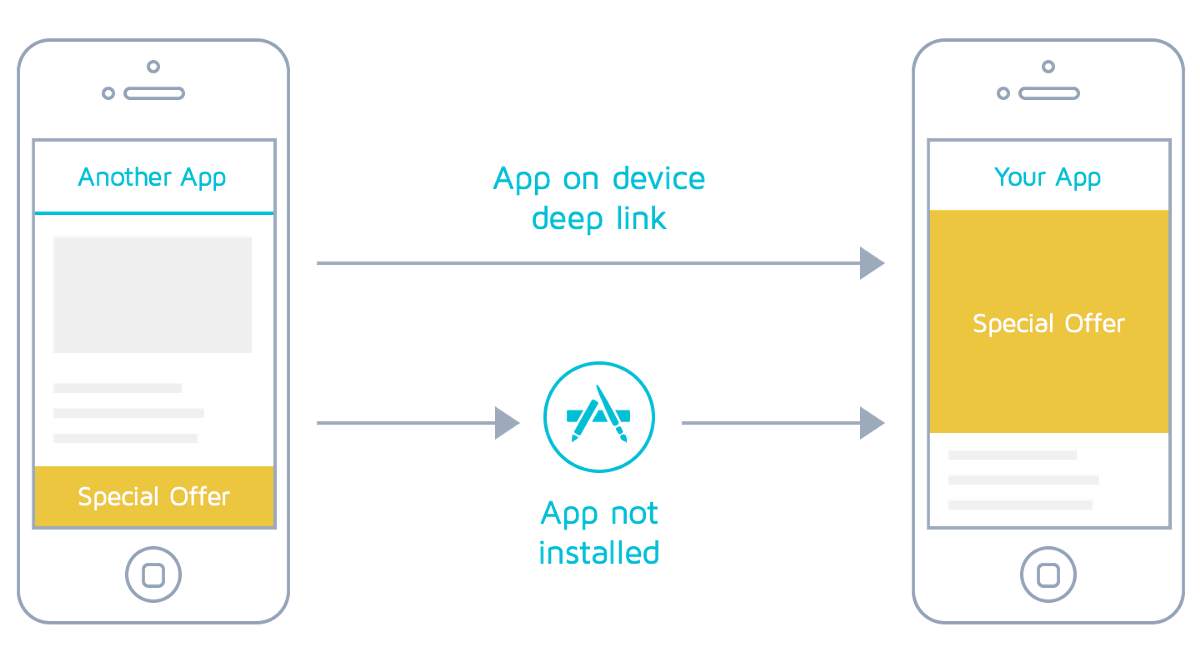
DeepLink is a kind of hyperlink that sends the user either to the app store or the app. It's a link of the screen present deep inside your app.
Deeplinks have 2 cases -
- If the app is installed, then it'll open up the screen present inside your app.
- If the app is not installed, then it'll open up the Play Store (in the case of Android) or App Store (in the case of iOS)
Types of DeepLink
In the case of Expo, the deep link can be of multiple types -
- Development in Expo Go:
exp://127.0.0.1:19000/--/path/into/app?hello=world - Published app in Expo Go:
exp://exp.host/@community/with-webbrowser-redirect/--/path/into/app?hello=world - Published app in standalone:
myapp://path/into/app?hello=world - Published standalone app (universal link):
https://www.myapp.io/records/123
The first two links can only be used inside Expo Go, that's why we cannot use them in our production app.
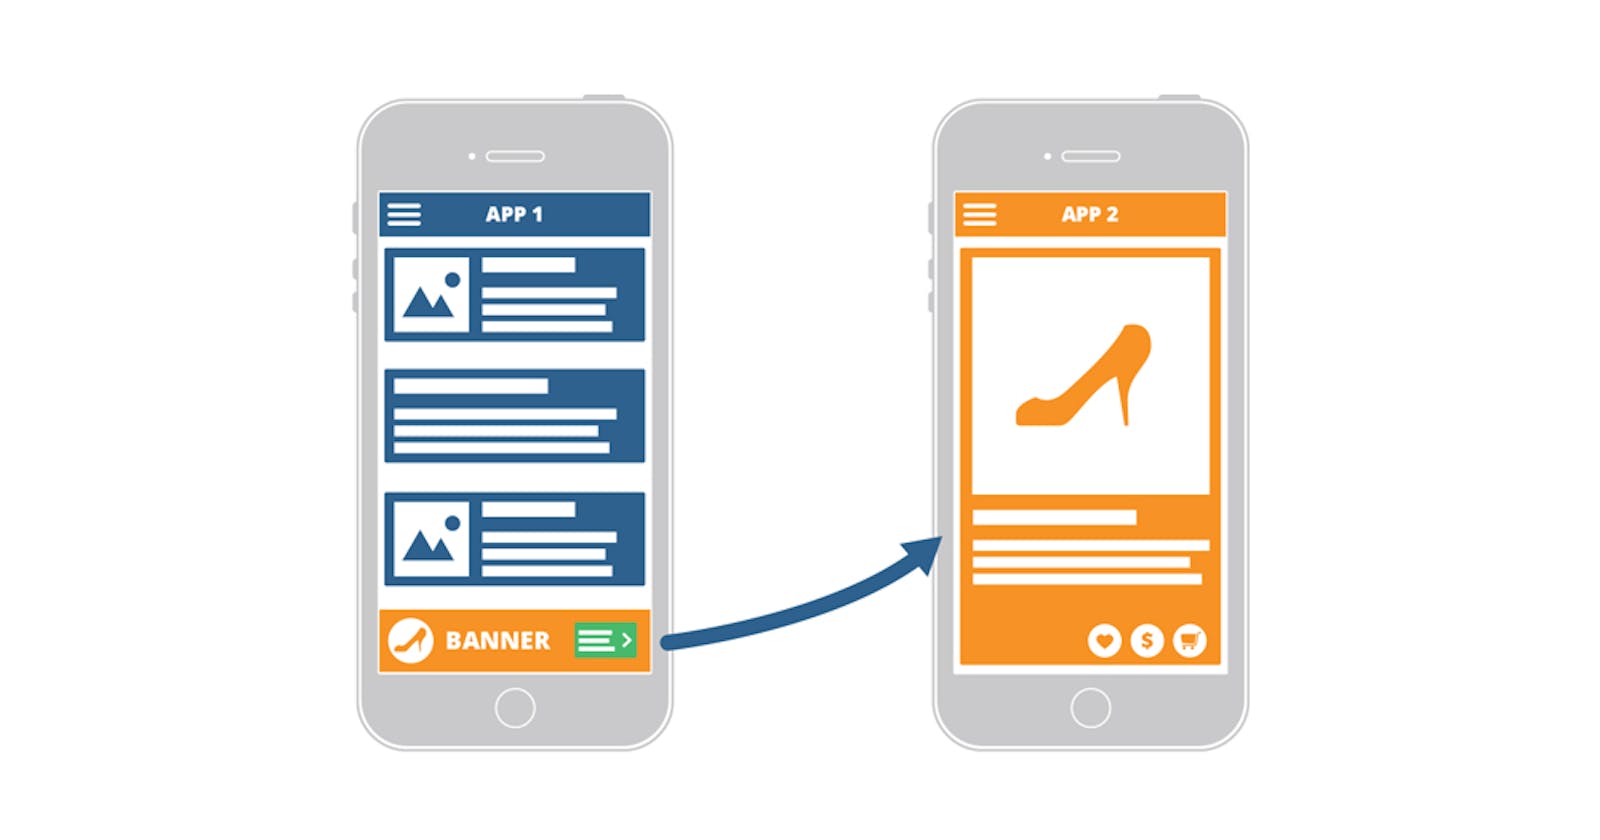
The third link is made with the help of something known as scheme. Scheme links are only useful if we open our app from some other app. For example, a button present inside App 1 opens up a screen in App 2.
These types of links when shared as a shareable link are not clickable. 😕

The third one is known as universal link, as it can be shared anywhere and are clickable (made up of HTTPS scheme). This is the link in which we are interested. 🤩
Use Cases
- Push notifications
- Can be used in emails which will open up the app directly
- Can share the links of screens (products, etc.)
App setup
Let's not use more time in theory and start setting up the app 😃.
We'll use expo-cli to create our app.
expo init deep-link
It'll ask for some options, choose Typescript with minimal screens and react-navigation.
We will start by adding 2 screens -
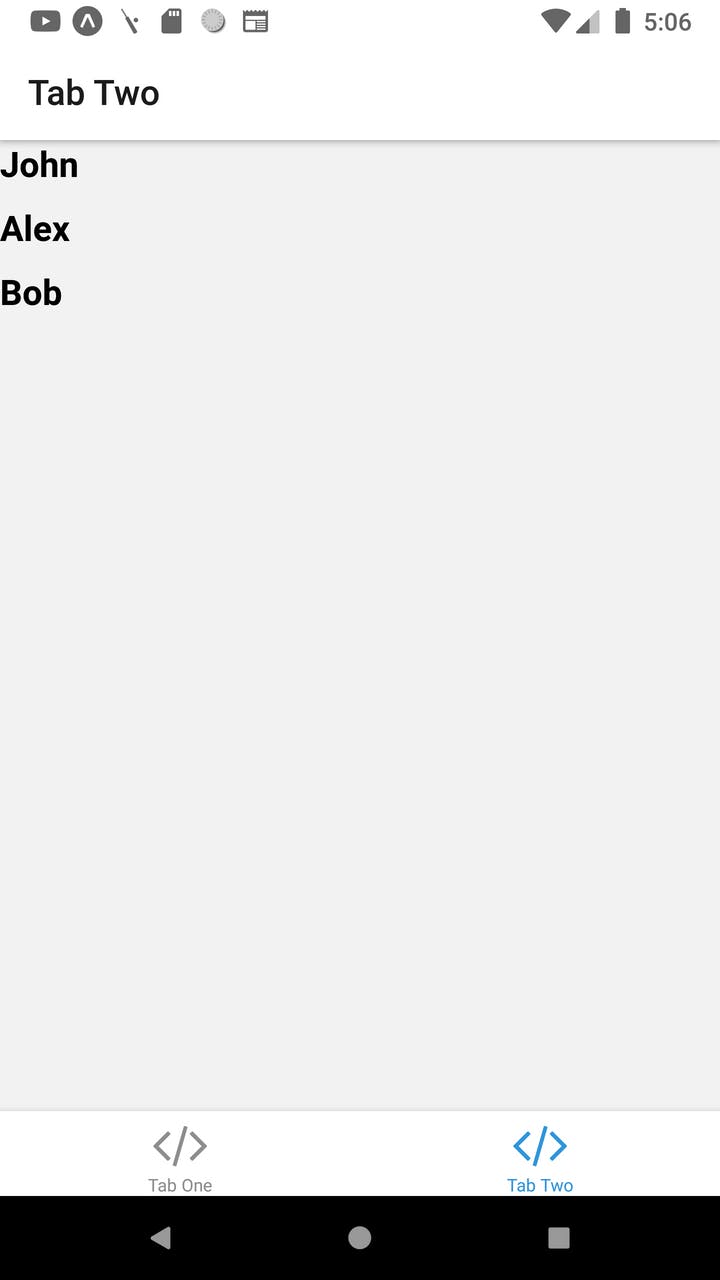
- All Users screen - It'll show all the users
- User screen - It'll show the individual user screen
We'll pass the userId from the All Users screen to the User screen.
AllUsersScreen.tsx
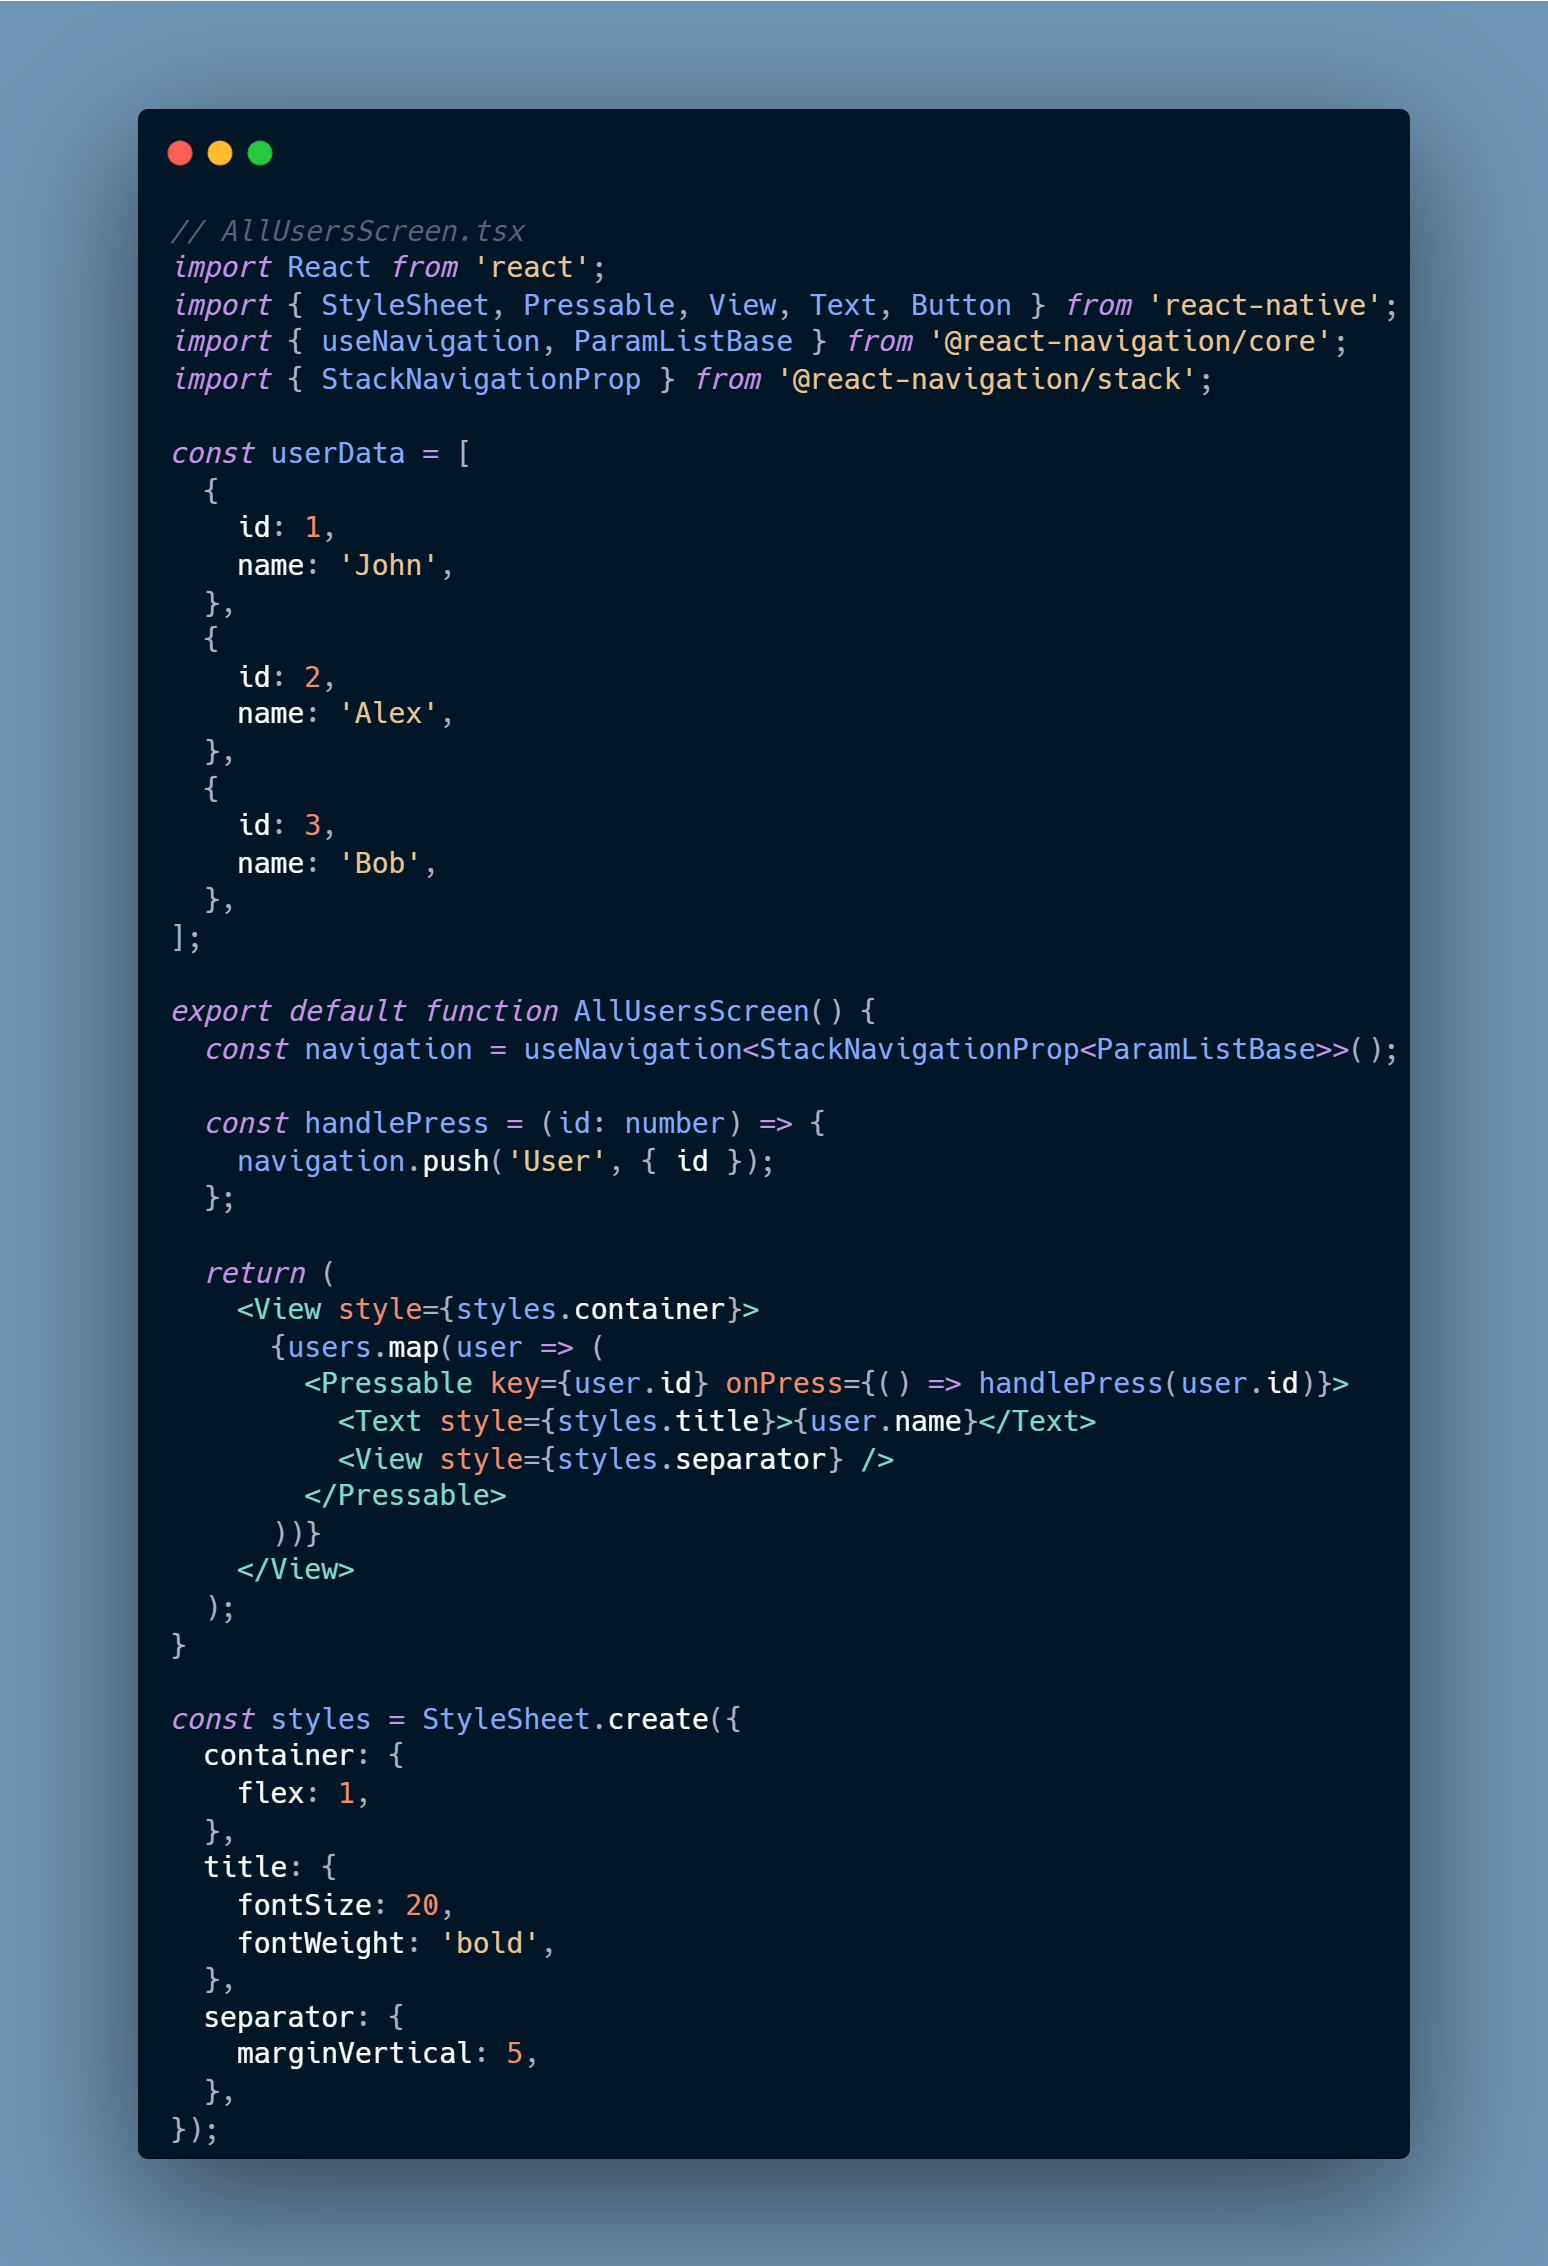
A simple functional component in which the userData is a static array of objects. Whenever someone taps on any of the user name, it will push to the new screen along with the userId.
Import this component inside the TabTwoScreen.tsx
import React from 'react';
import AllUsersScreen from './AllUsersScreen';

export default function TabTwoScreen() {
  return <AllUsersScreen />;
}
The next step is to set up the UserScreen
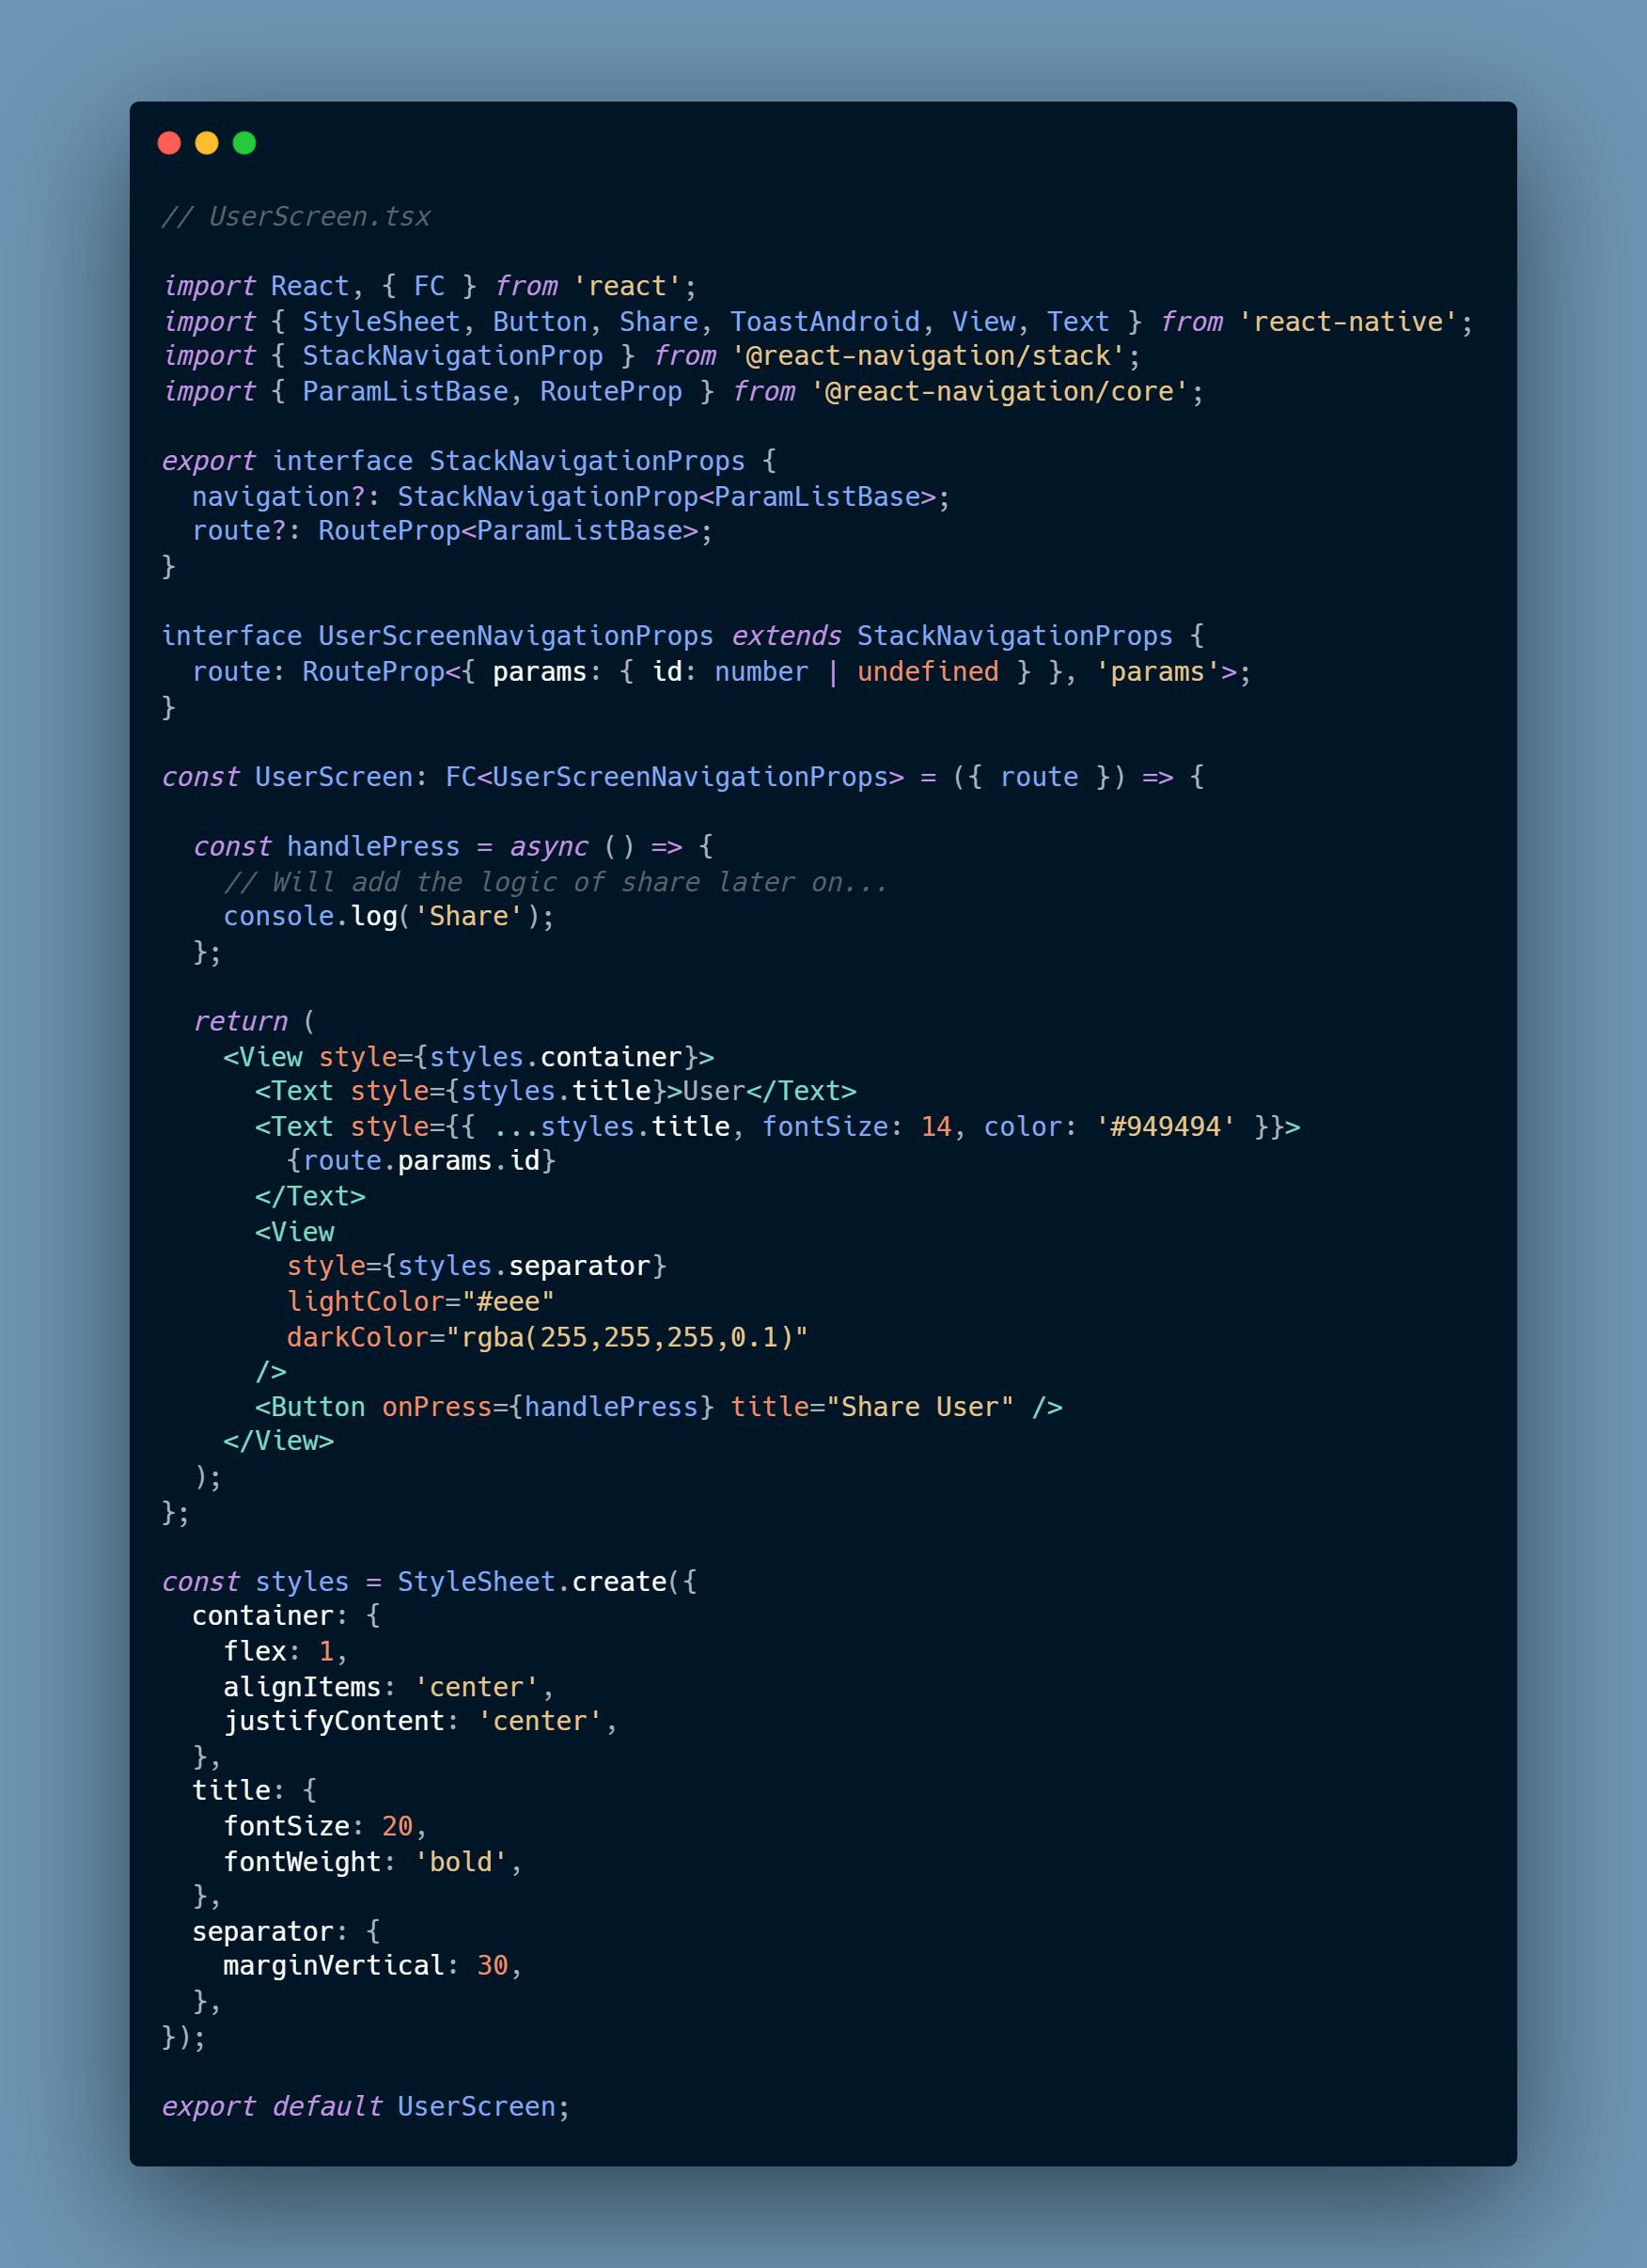
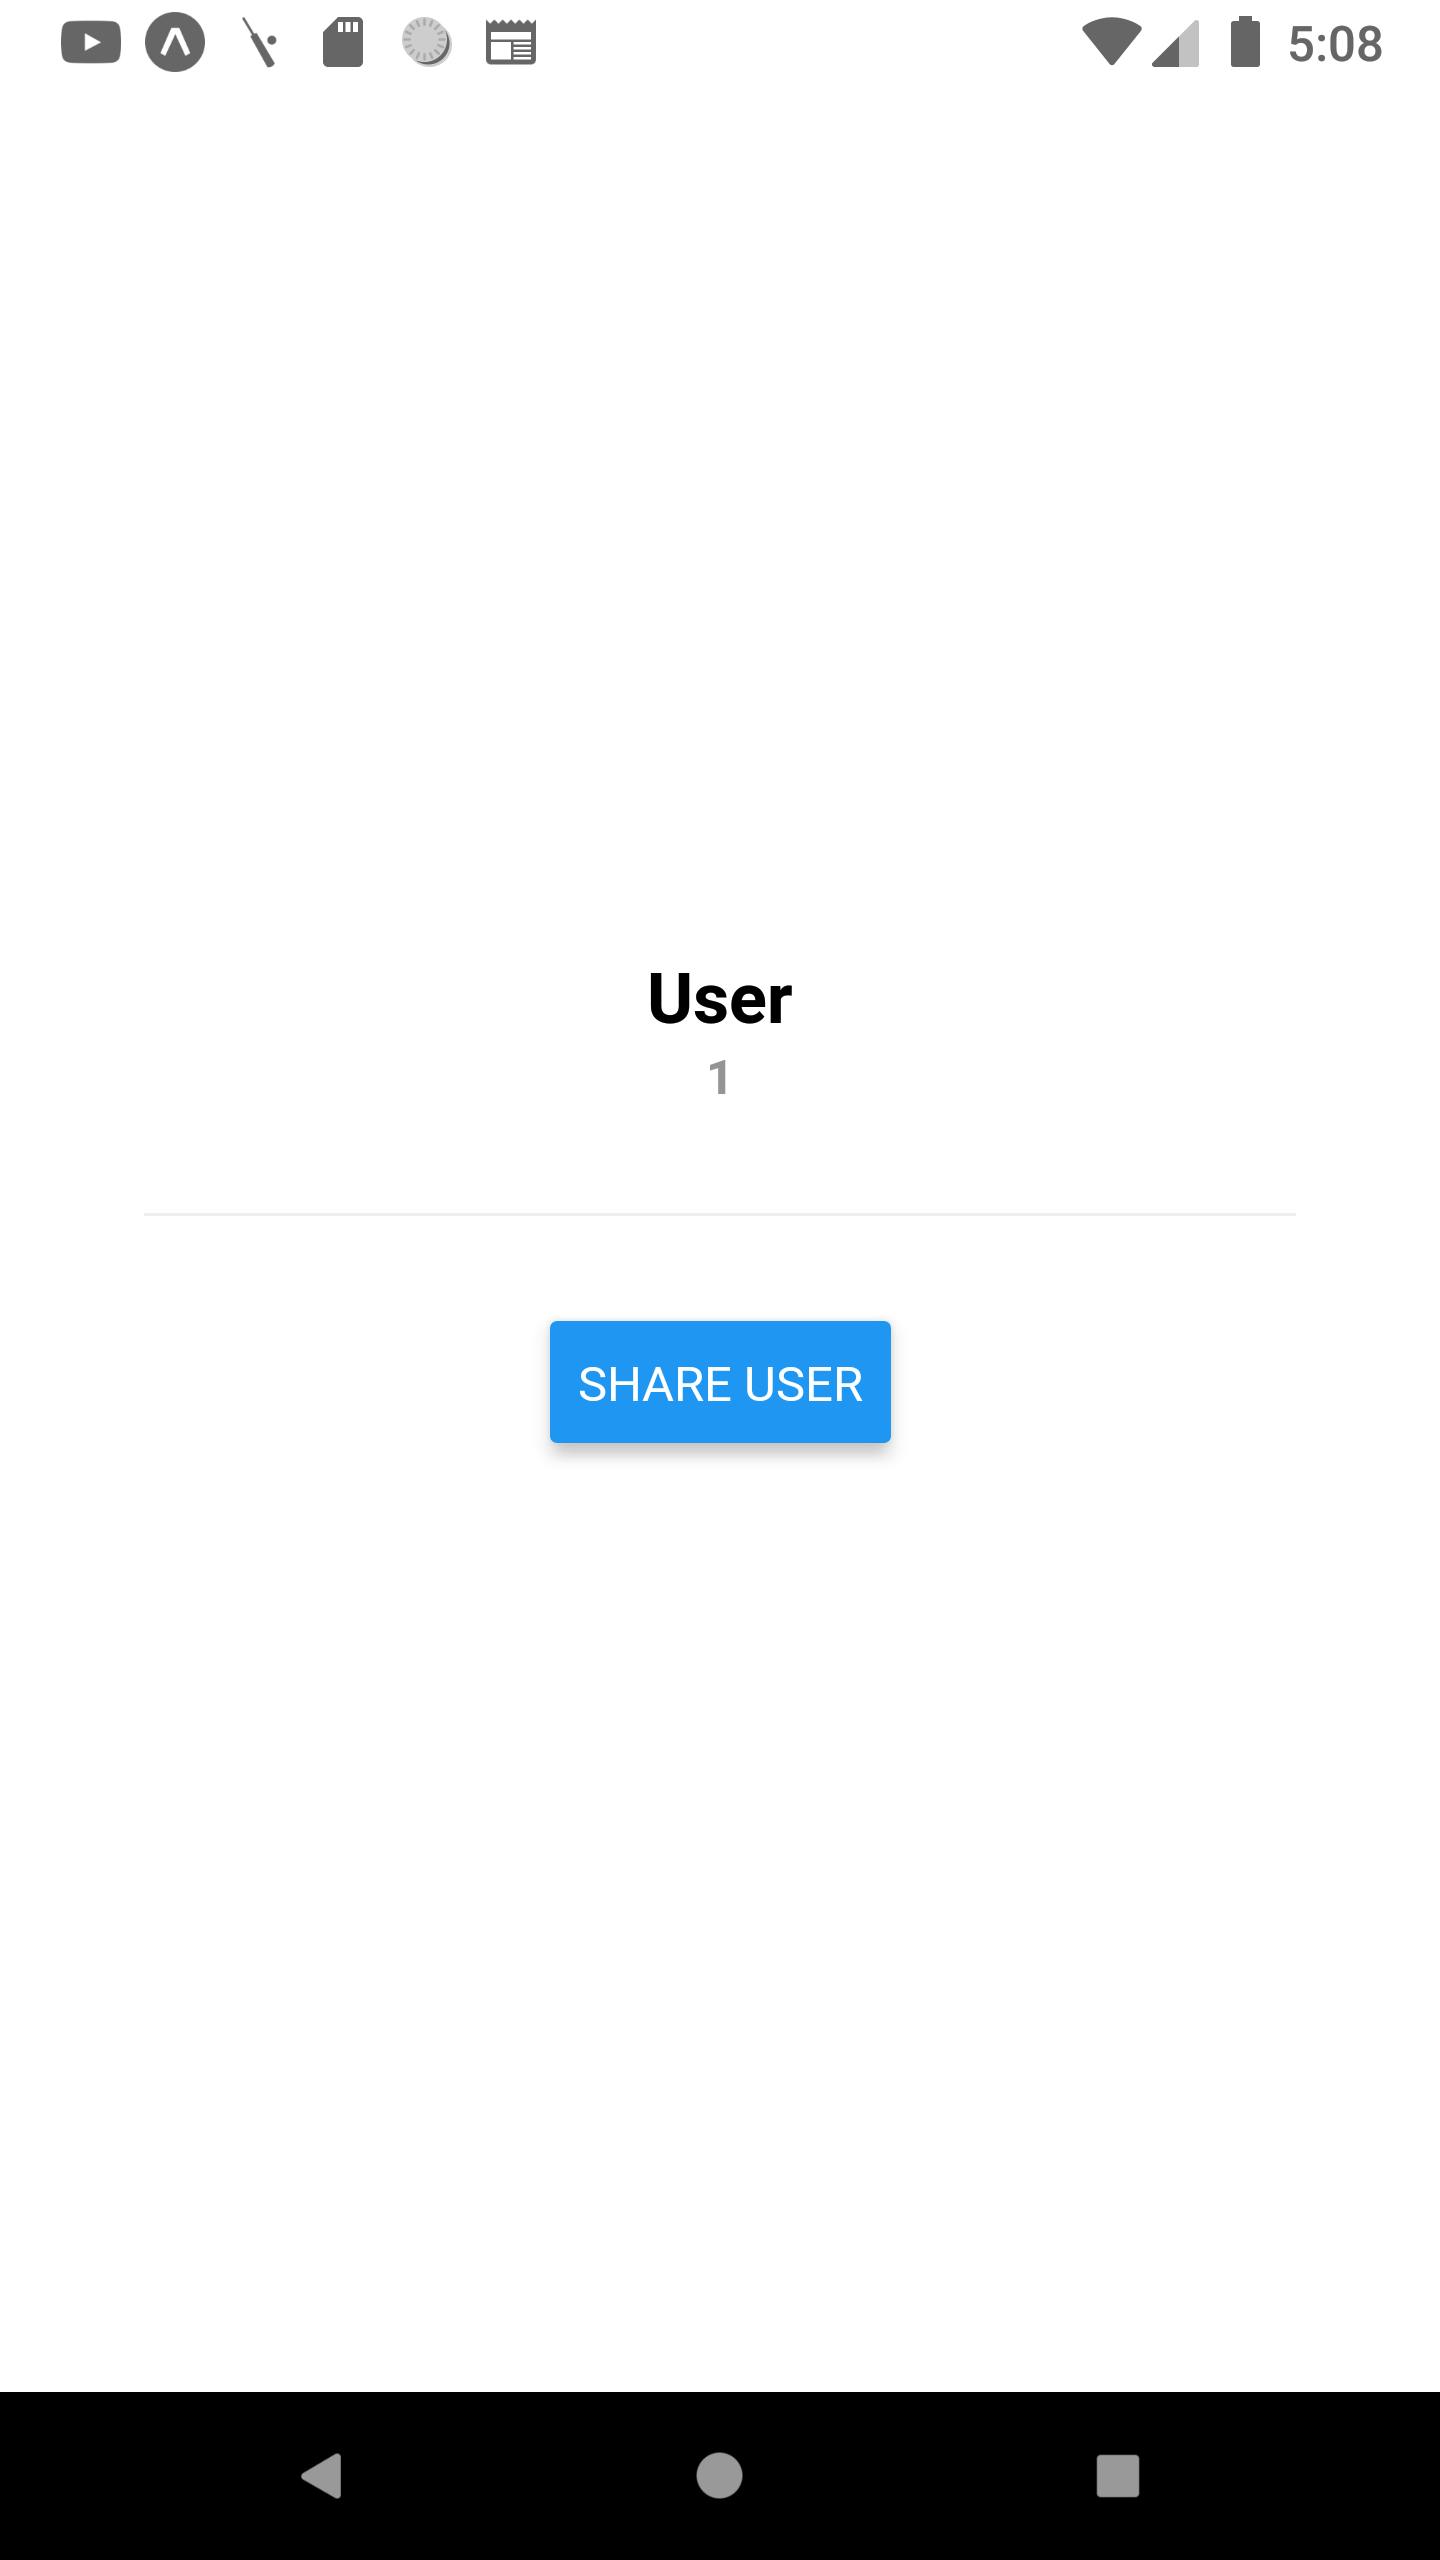
Again a basic functional component in which we have created a base react-navigation interface. The base interface is then inherited by a screen-specific interface, which is in our case, UserScreenNavigationProps. The interface is for accepting id as a route parameter.
Now, we need to add this component in Stack.Screen to define the screen in our StackNavigator.
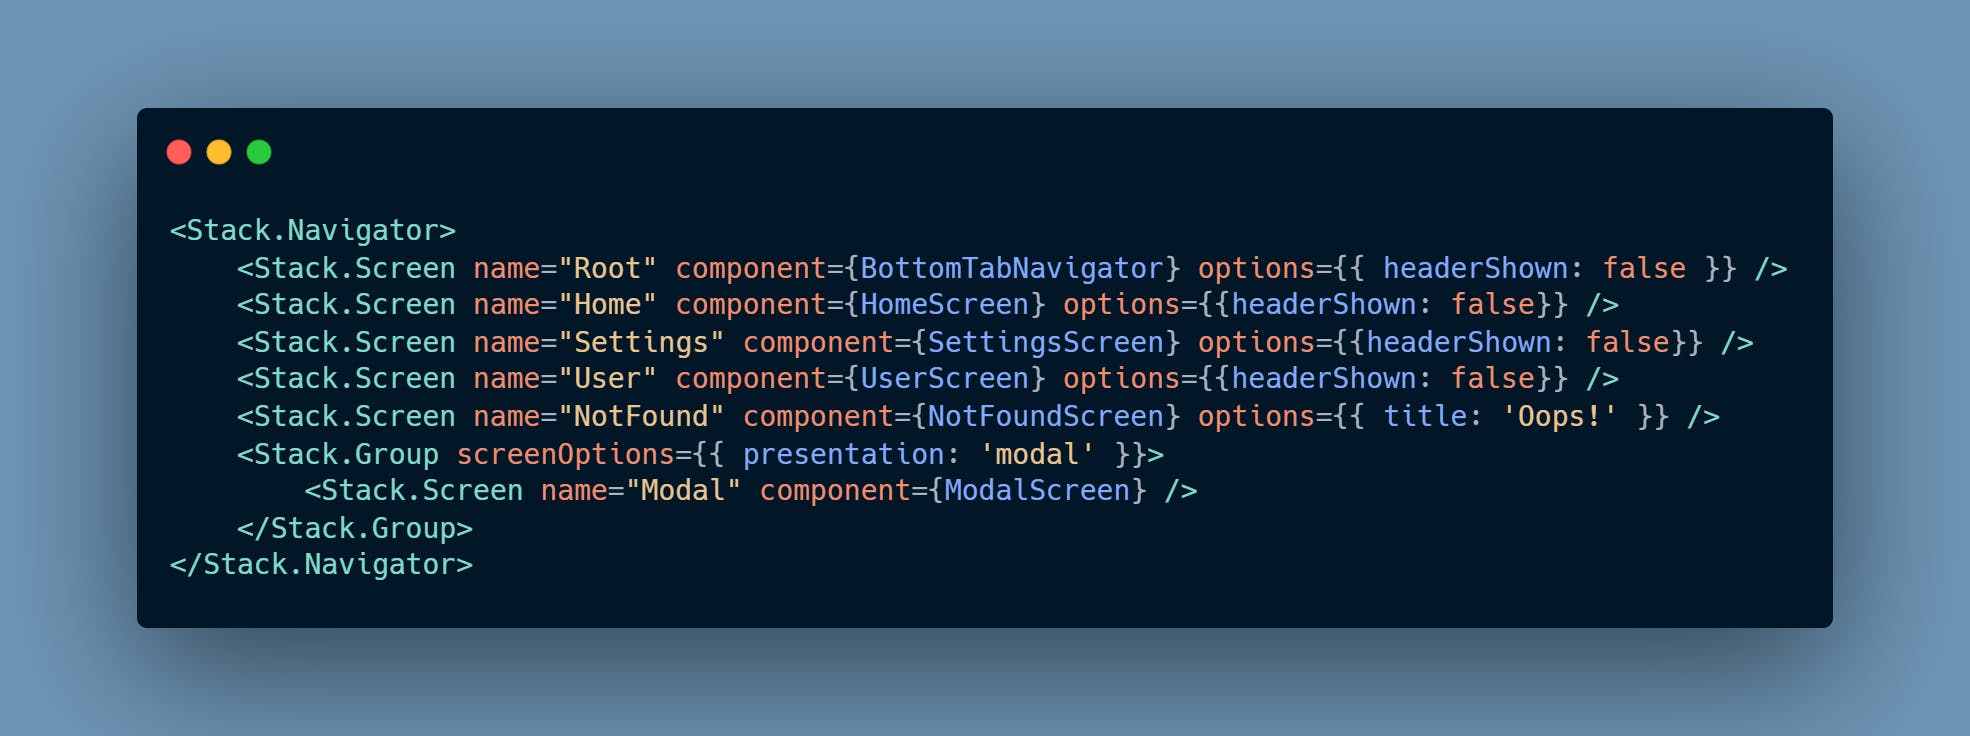
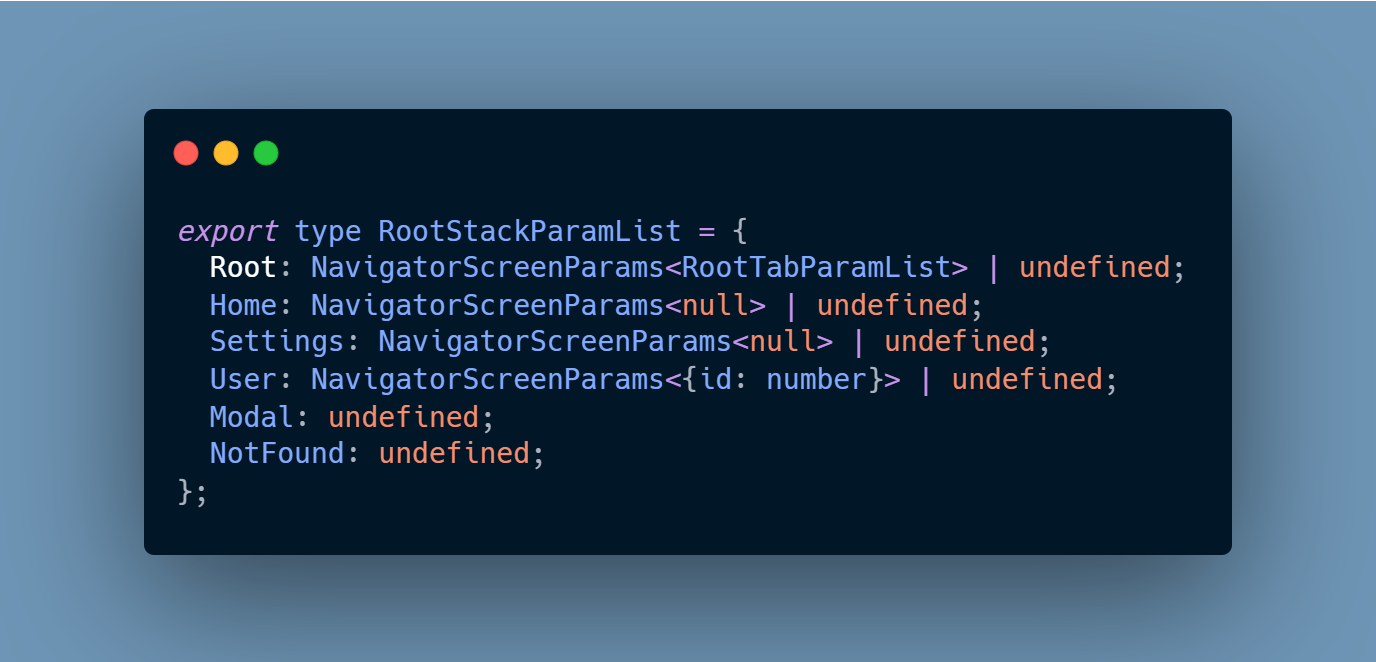
Most of the screens came from the template. Ours is User. The typescript might give an error so inside types.tsx file, edit type RootStackParamList
Firebase Hosting setup
We will set up the share link logic later on because first, we need to do the setup of the universal link on our web domain side. The expo docs say that we need to deploy two files on a web domain - /.well-known/apple-app-site-association (iOS) and /.well-known/assetlinks.json (Android).
We can do this easily by creating a Firebase project and then using Firebase hosting.
So, the first step is to create a Firebase project. Just open Firebase console and click on Add project. It'll ask for the name of a project, give it a name and that's it. The project is created. 😌
Now, we can open Firebase hosting and follow the steps.
firebase loginNeed to log in to firebase through CLI.Create a directory and inside that directory, run
firebase init
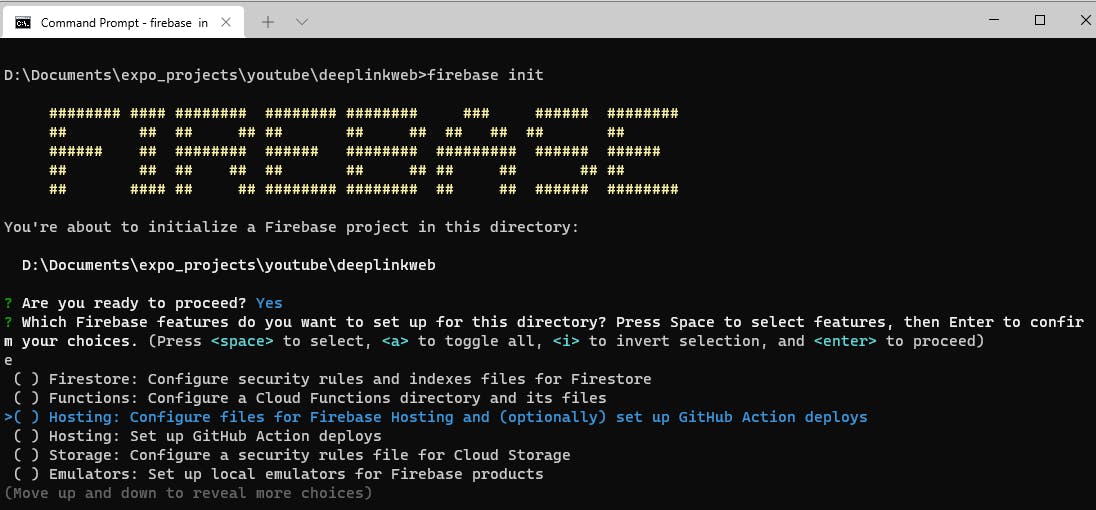
It'll ask many questions, we need to select Hosting: Configure files for Firebase Hosting and (optionally) set up GitHub Action deploys
Then after this the project ID, which will be the same as one on our newly created Firebase project.
After answering all the questions, it'll create our app.
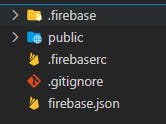
The project structure will look something like this, a basic application. We can start with the Android setup first.
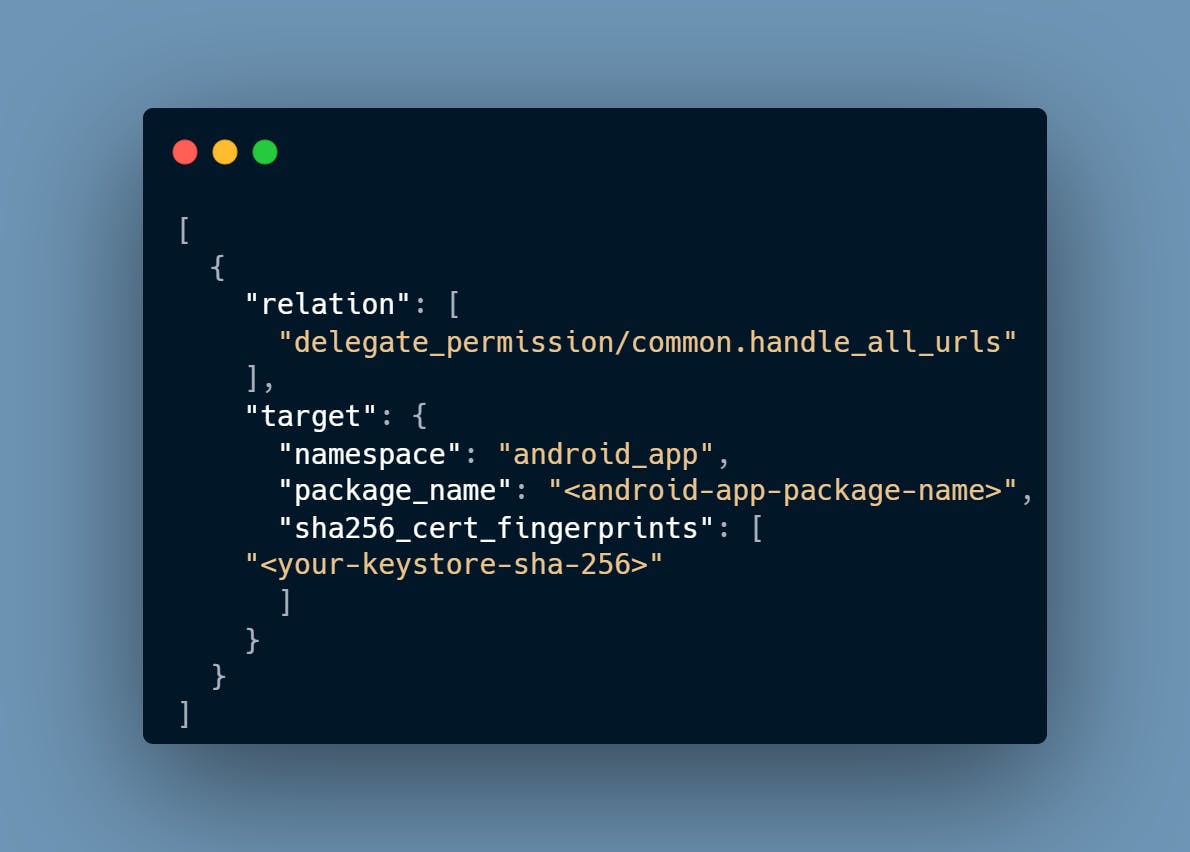
- Create a directory
.well-knowninsidepublicdirectory. - Inside
.well-knowndirectory, createassetlinks.jsonfile. - Add the following content inside the file. Details about this file can be found on Android Documentation.
Next, we need to edit the firebase.json file. Add the following content inside it.
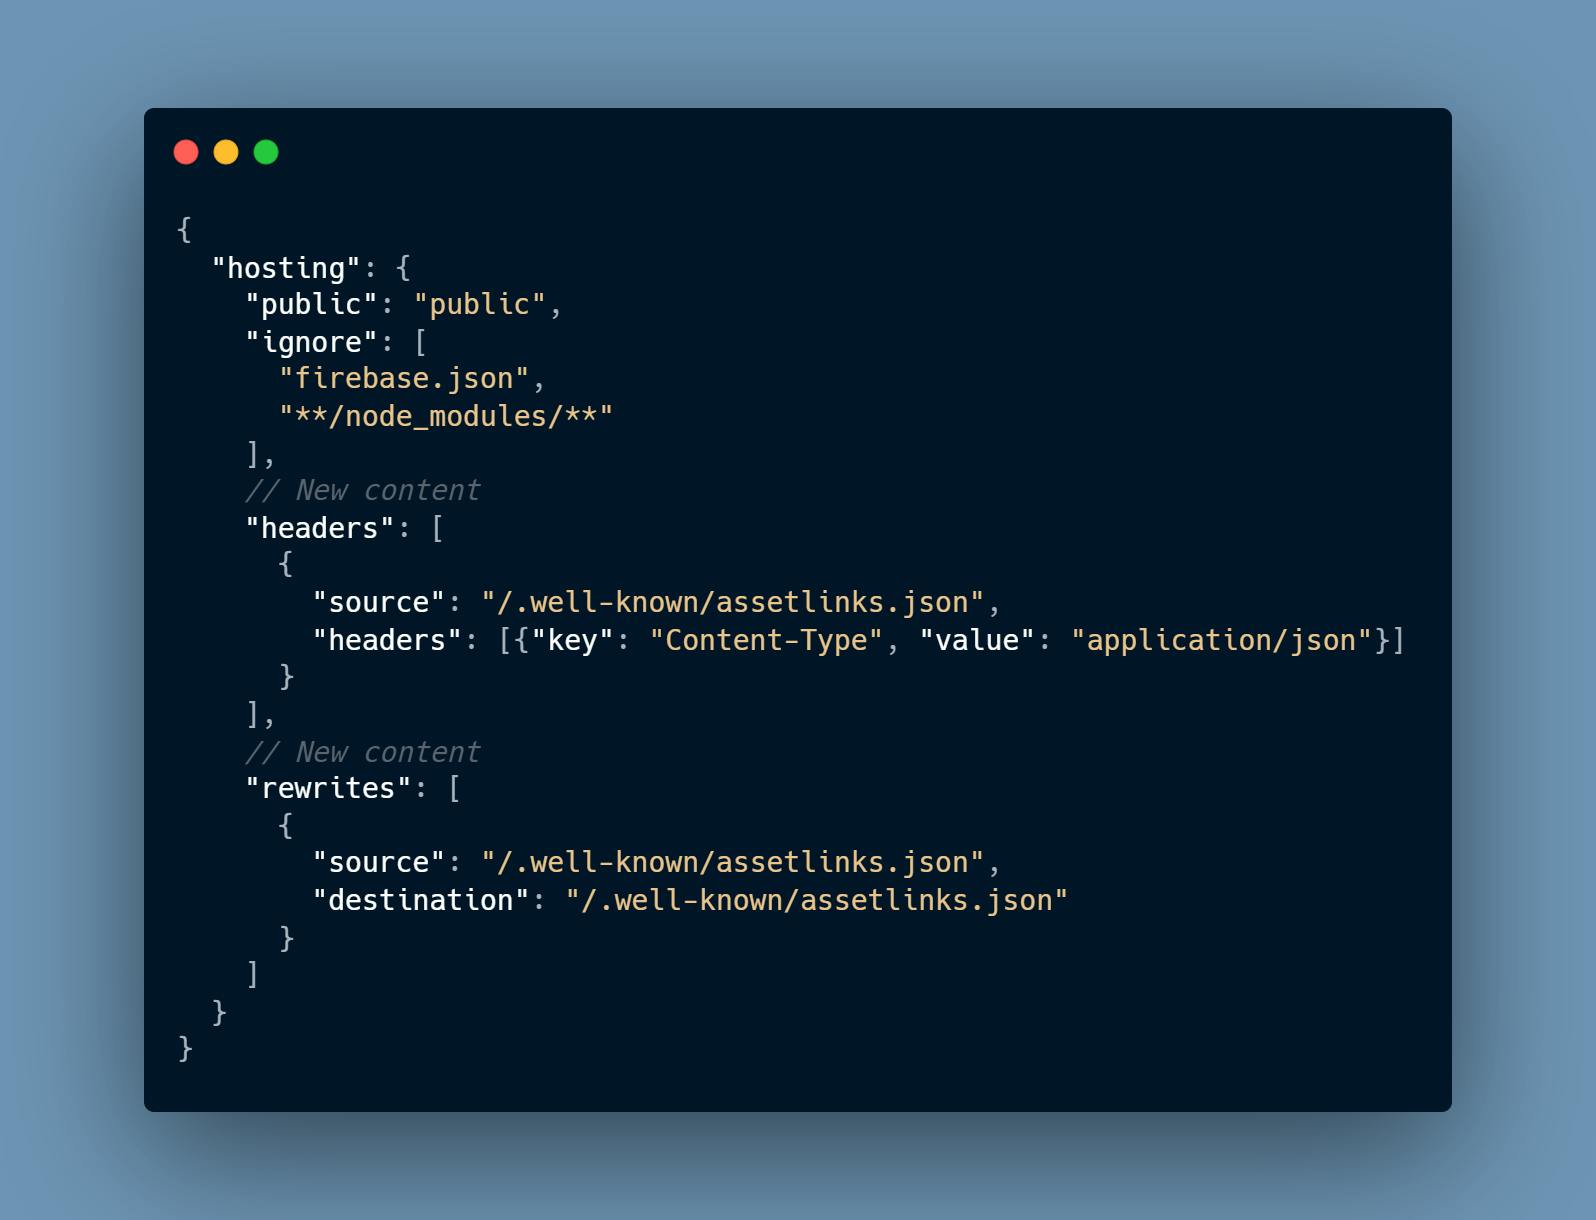
headers is important because this file is JSON and it needs to have the appropriate header for serving the JSON content.
rewrites is used because the docs say to use it in case of creating a custom domain link.
At last, we can deploy the website by using firebase deploy.
The site is ready, we can check the file by opening the web app - https://<domain>/.well-known/assetlinks.json. It'll show the content of the file.
Firebase Dynamic Link setup
This one's a very short step. Just visit Dynamic Links inside Engage section. Add a new URL prefix. It can be anything, your own domain also, we can also use the one provided by Firebase.
I'll be using dynamiclink.page.link. The .page.link subdomain is provided by Firebase.
Back to App
Now, we can use these domain values to resume our universal link setup in the app. For Android, we need to edit the app.json file of Expo and add the intentFilters and package name.
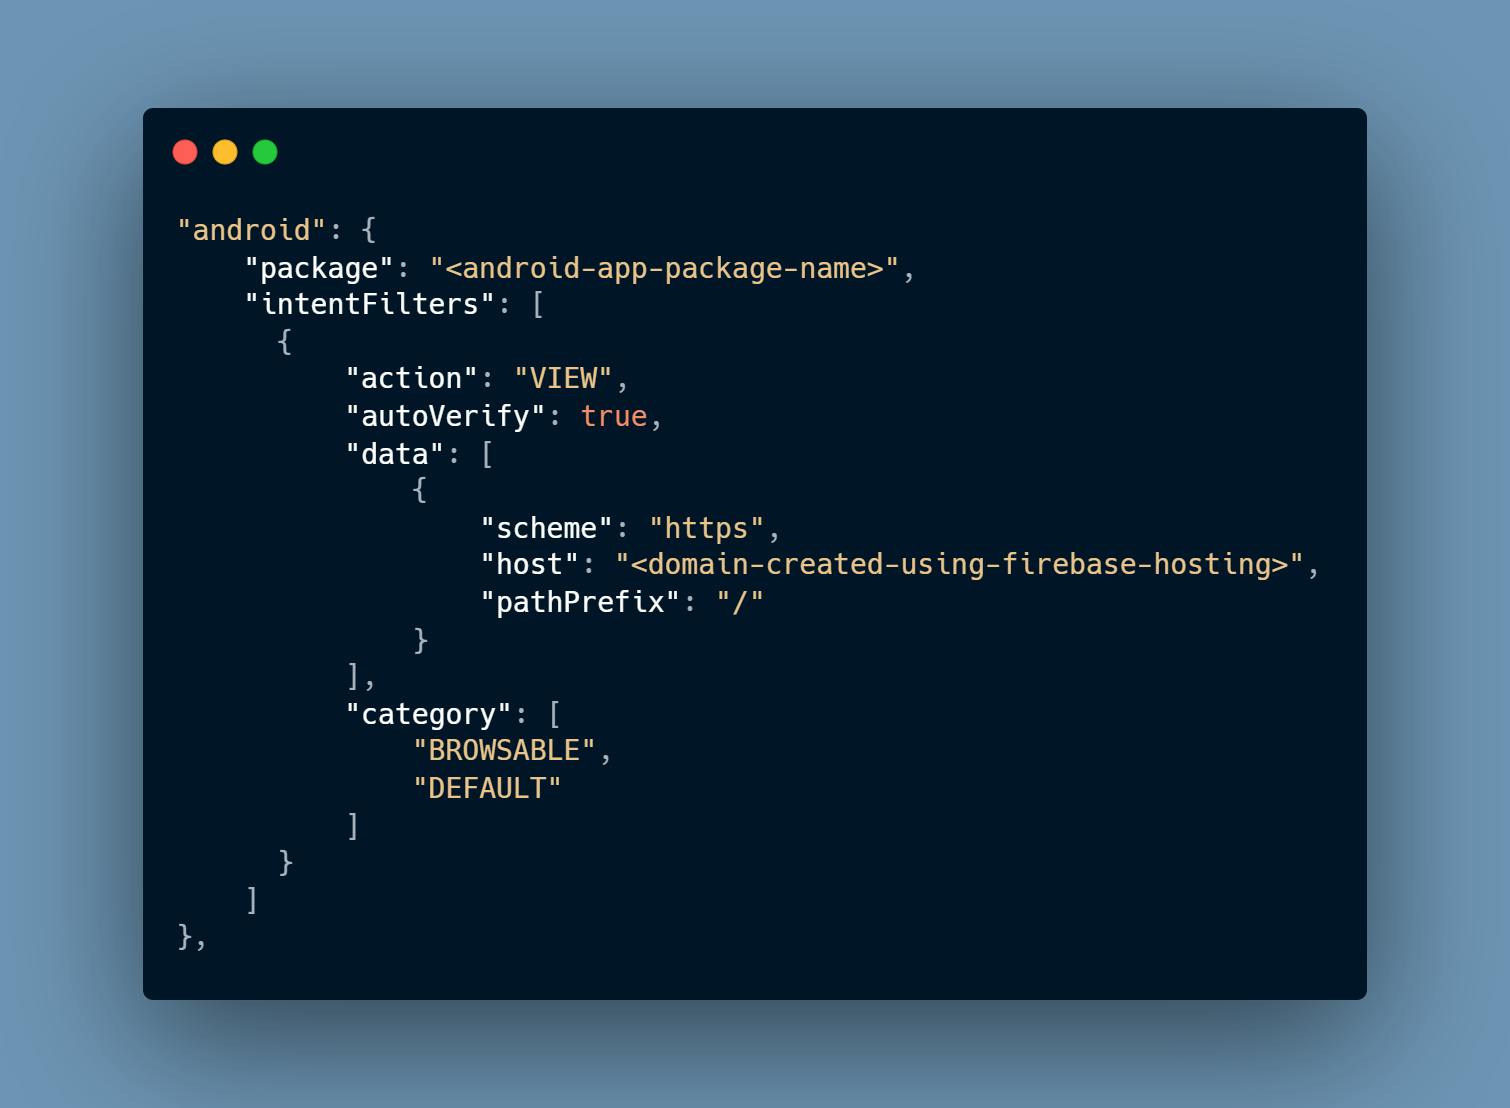
The domain will be the one created using Firebase hosting.
After this, we need to add the logic in our Share user button.
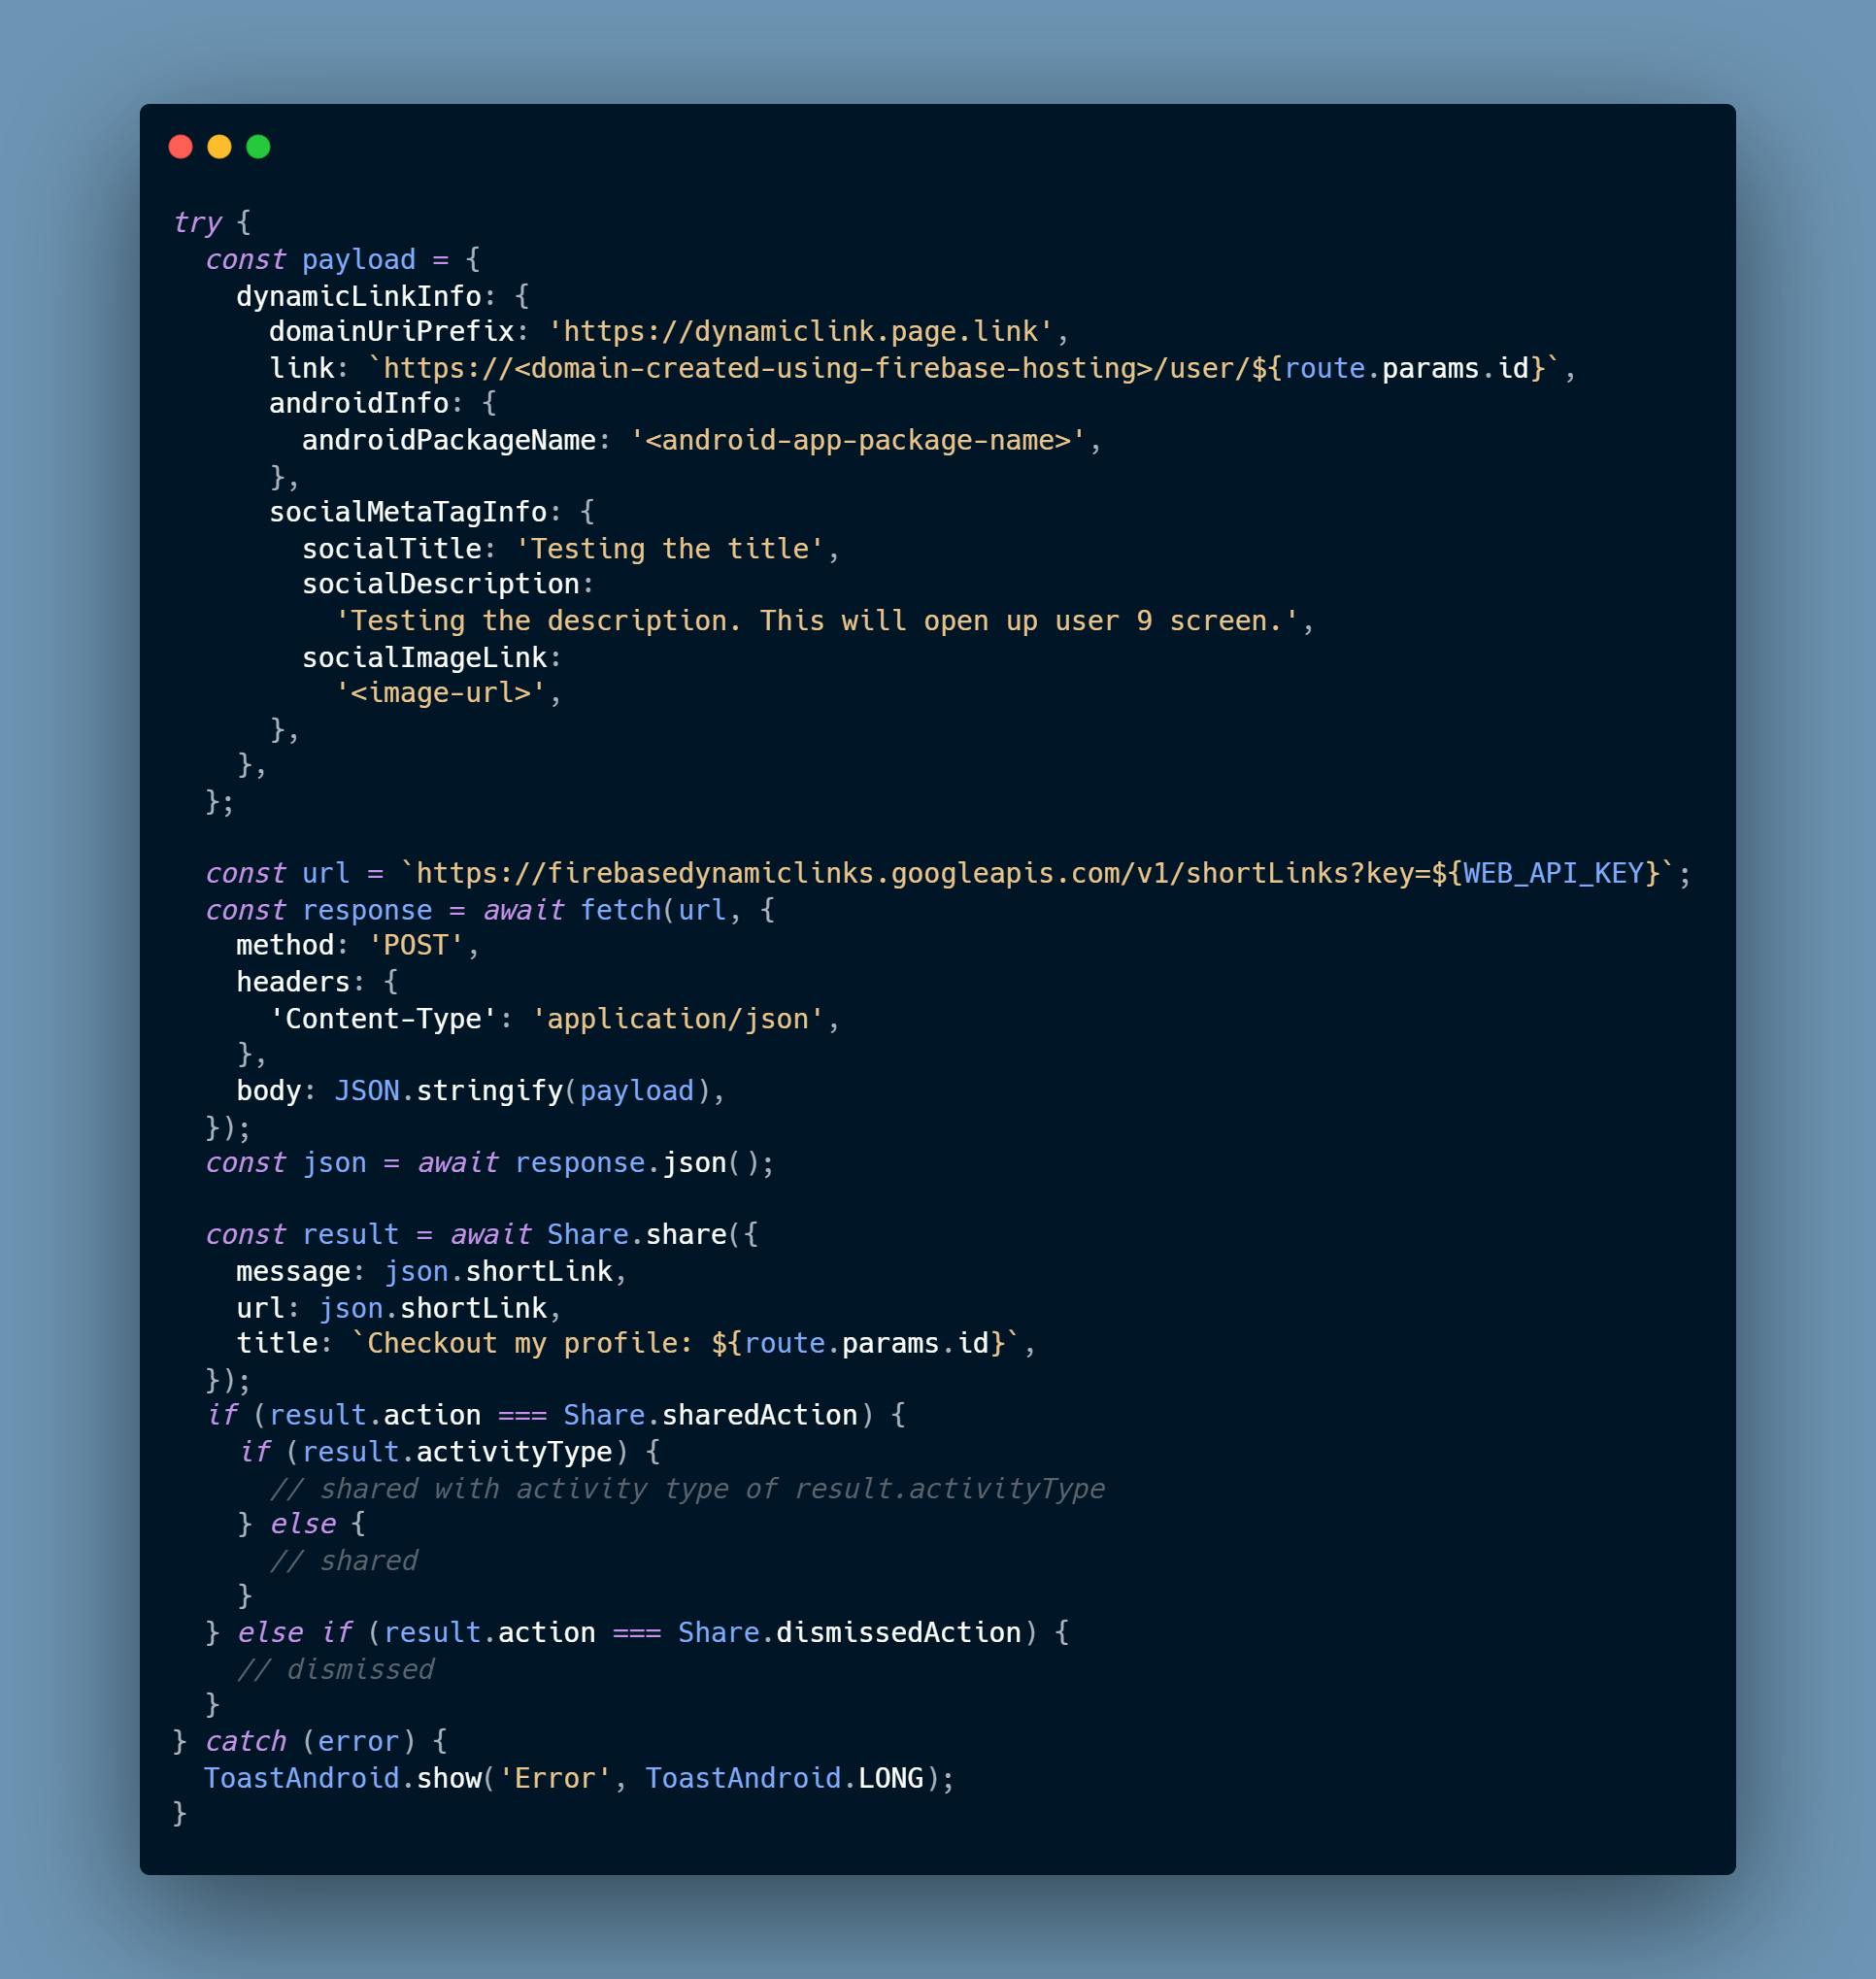
Hah! 😵 Too much code 😆. Well, can't do anything, it's needed. Anyways, let's see all the important things in this.
Payload and the URL are two important things. Rest is easy, first is making an HTTP request to the URL and the other one is a template provided by Share module of React-Native.
The URL is for generating the short version of the dynamic link which we can share. It's provided by Firebase, can check about this on the documentation of Firebase Dynamic Link - REST.
It's a POST request and also accepts WEB_API_KEY. We can get the API KEY by generating a web app in our Firebase project. A POST request also requires a payload object. That's why we are passing one to it.
The valid properties of this payload object can be found here. We are using only a few important properties.
- domainUriPrefix: This one's generated using Firebase Dynamic Link
- link: It's the path that can be handled by our app. It should open any screen in our app.
- androidInfo: Android related info
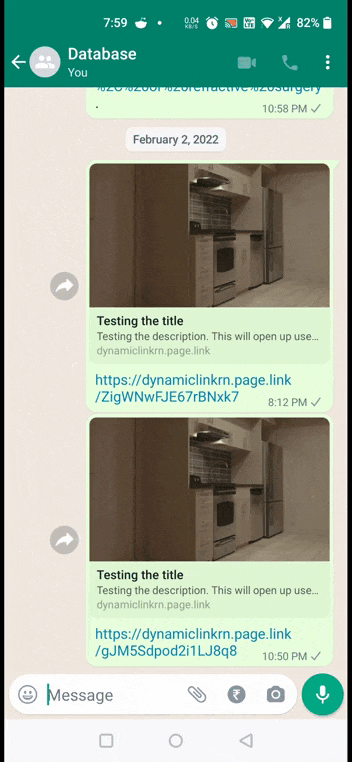
- socialMetaTagInfo: Social Meta info, whenever we share the link on some other app, like Whatsapp, then it'll show the image, title and description provided in this object. 😎
In link property, we should not use the Firebase Dynamic Link domain, because it'll give a warning and it won't open up the app. It'll only open up the home screen of the app. 😪
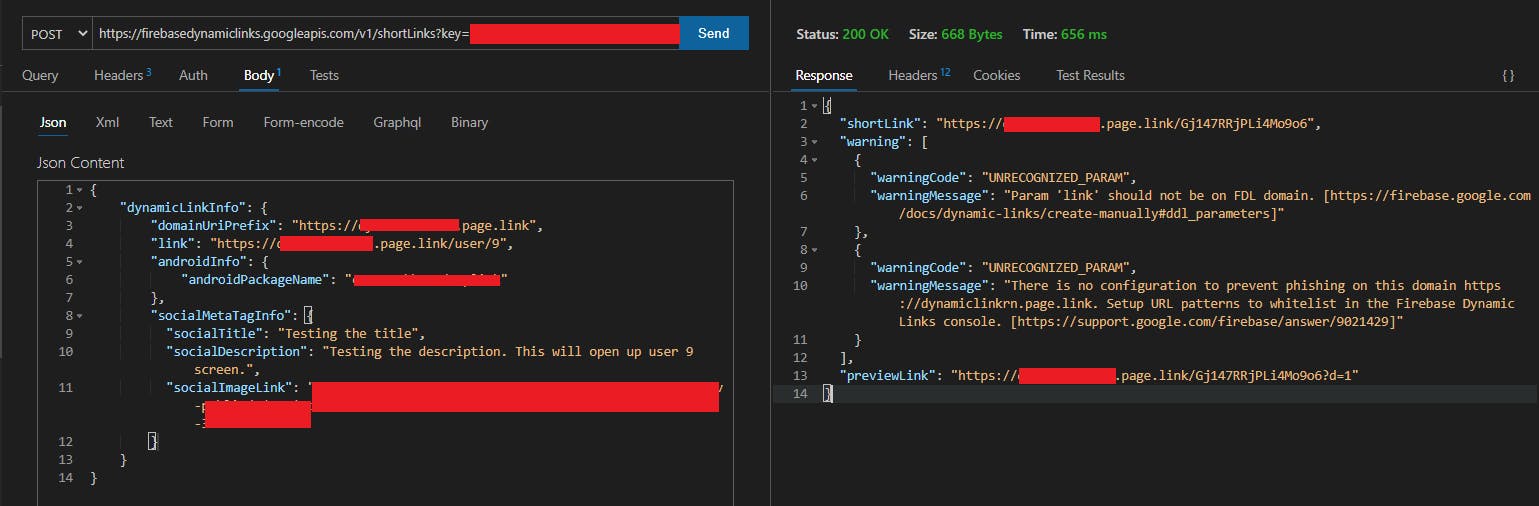
The first warning - Param link should not be on FDL domain.
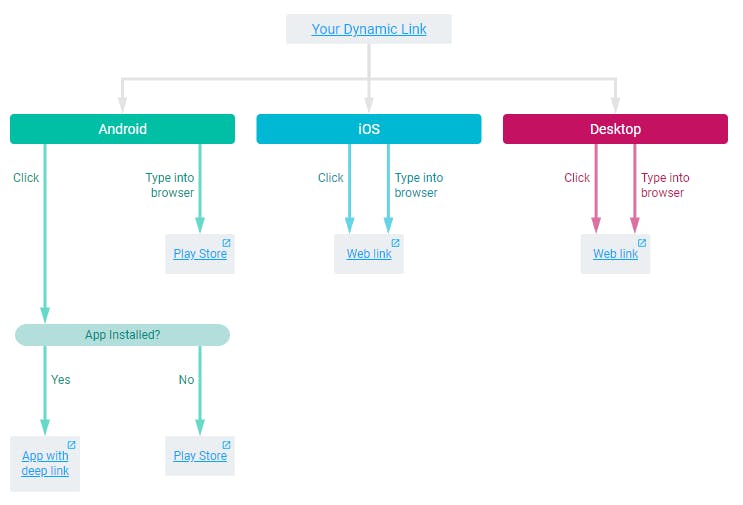
As you can see, it generates two links, shortLink and previewLink. The shortLink is the one that we can share with other apps. The previewLink contains a flow chart created by Firebase to visualize the flow of the app.
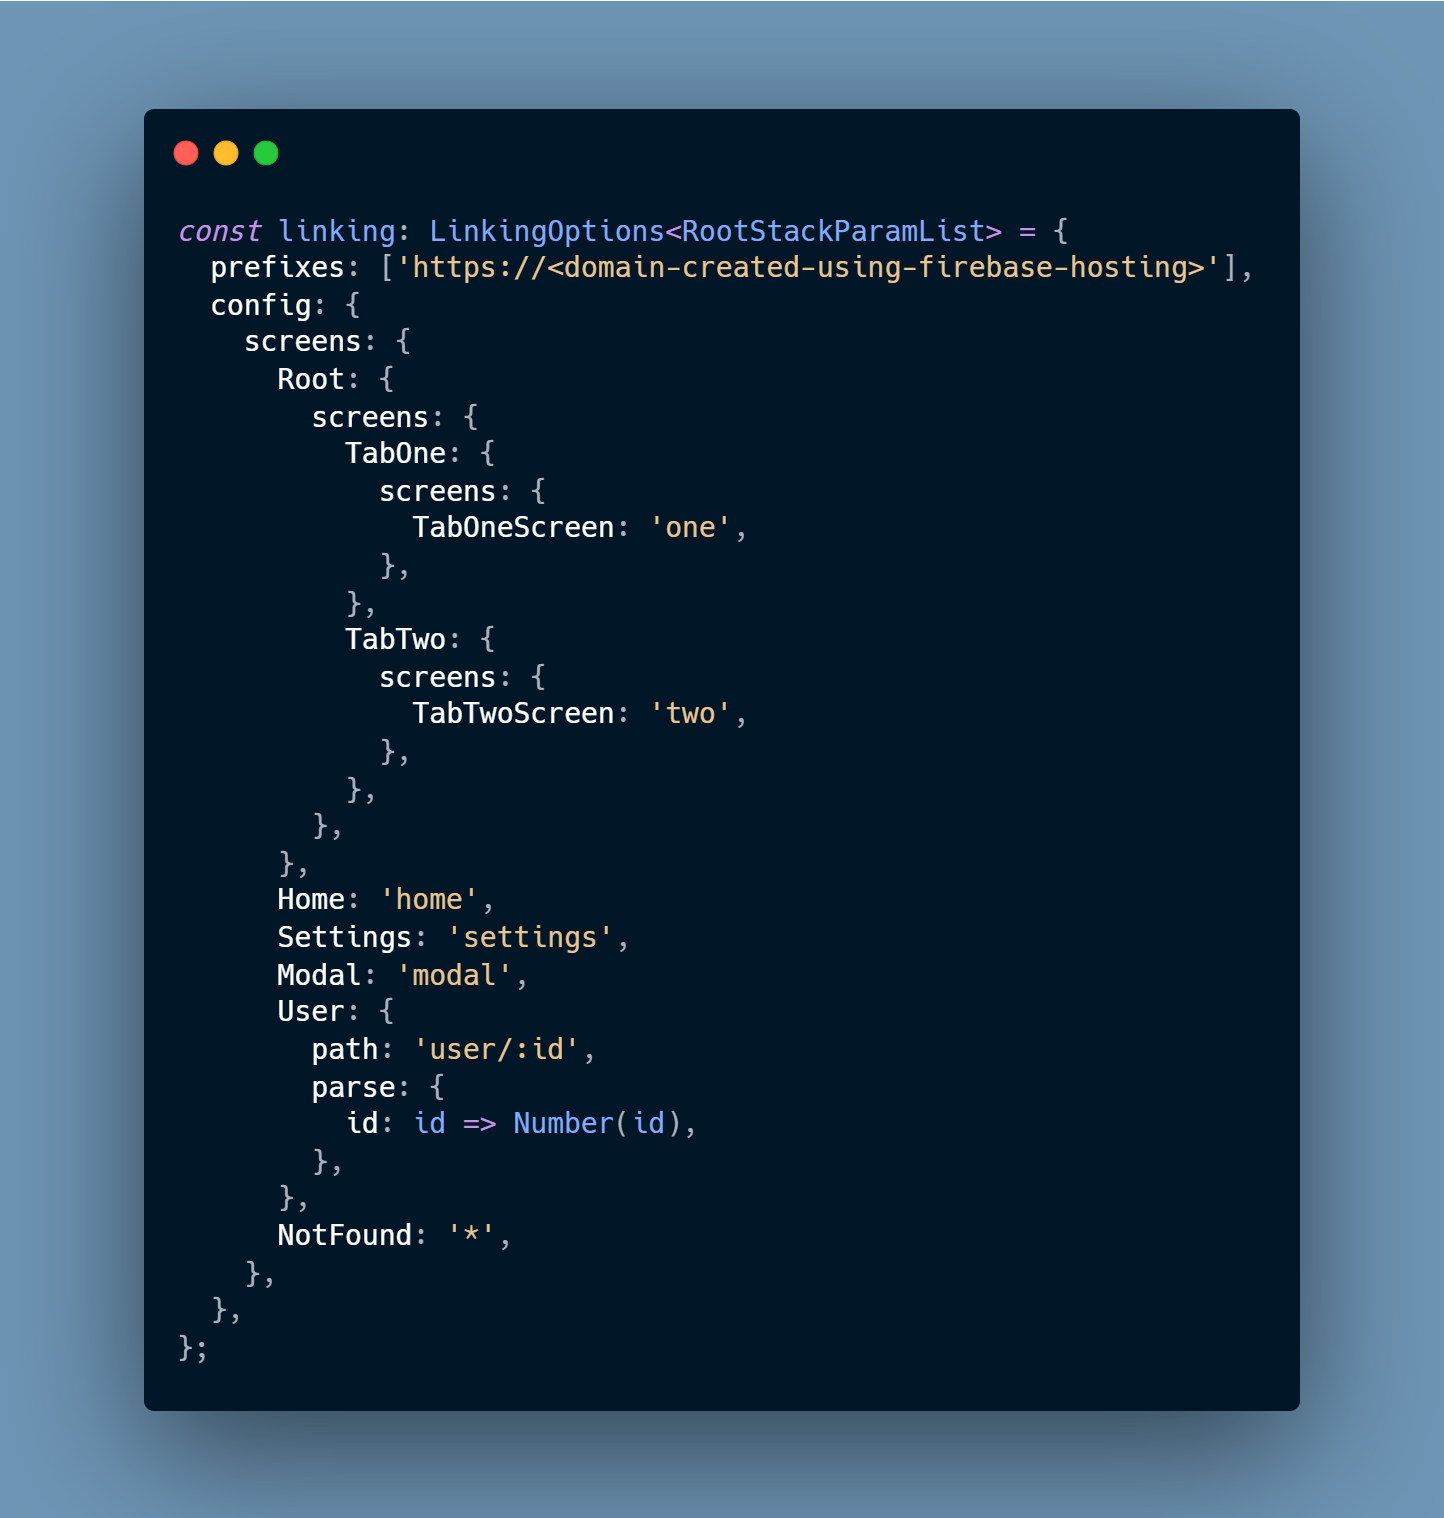
The last step is to edit the linking configuration of our Navigation container. We will add the prefix value and define our User route.
And with this last step, our ready is ready to build. We can use the eas build to build the app. The docs are very good so you can follow those to create the build.
The iOS is almost the same, just follow the docs along with Android and you'll be able to easily configure it. 😛
And finally, we have our working Universal link 🤩
If you were able to follow up till this point then congratulations 🥳. You finally know how to set up the universal link in Expo. 😎
That’s it, this is where our journey ends. I hope you were able to reach this point. 😃
Thanks! And stay tuned for more articles on React/React-Native 🤩😎
[EDIT 1] - It'll be better to move the share logic to your backend application in order to provide some security to our application by hiding the Firebase Web API key.